Mankind has all but won the war on nature. Species are in retreat all over the world and here in the UK the situation is no different.
However, although the outlook for nature looks a bit bleak, all is not lost and there is one direct and simple action that you can take to help call a truce with nature and that is to dig a pond in your garden.
What do you need?
- A garden or patch of land big enough to host a pond. This is the biggest item on the list of requirements. And given the current cost of housing and land in the UK it will remain the most difficult for the forseeable future.
- A person with enough physical fitness to dig a hole in the ground approx. 1 metre long x 1 metre wide and at least 30cm deep. Those sizes are not set in stone and can be adjusted to suit your area.
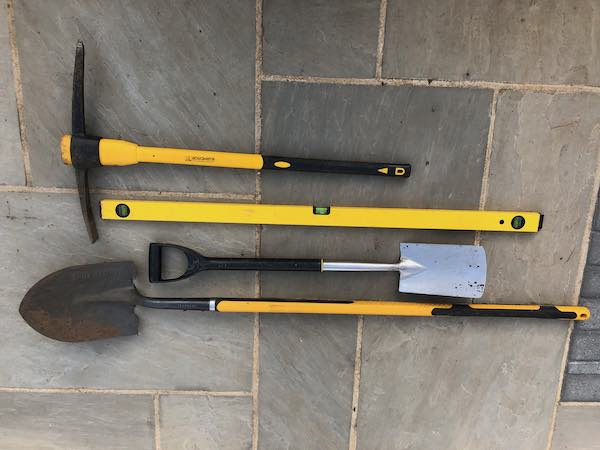
- Digging tools. Ideally a garden fork, spade, shovel ( I use a cornish shovel like gangsters use for burying corpses ), a pick or micro pick for getting rid of stones or roots in the ground. Example below shows a pick, spirit level, mini spade and corpse shovel. No fork shown for some reason in the picture, but I do use one.
- Some way of getting rid of the excavated soil. Even a small pond will create decent size pile of soil. Several ways of doing this exist. For example, hire a skip or grab lorry, take it to the tip, although some tips charge for soil nowadays, build it in raised planters or lose it within the garden like the prisoners did in in the 1963 film The Great Escape. You don’t have to be sneaky about it the way they were in that film, you can just simply spread it out on your flower beds in full view of everyone.
- A plastic pond liner and underlay. Pond-liners are used to hold the water in the pond and without some water tight lining the water will escape into the ground. Choosing a pond liner is discussed in detail in the section “Choosing your pond liner”.
How hard is this going to be?
The difficulty really depends on a few factors:
How phyically fit you are. You don’t have to be an athlete to dig the hole for a pond, but the fitter you are the easier it is.
How tough the ground is and the tools you have. If you start digging and discover lots of buried rubble from lazy builders or previous owners, then yes, the task becomes tougher. That has happened to me on occasion and this is when a pick or mattock are invaluable.
The size you plan to make it obviously has a bearing on the difficulty – the bigger you make it the more digging needs to be done and of course, the more earth you have to remove from your garden.
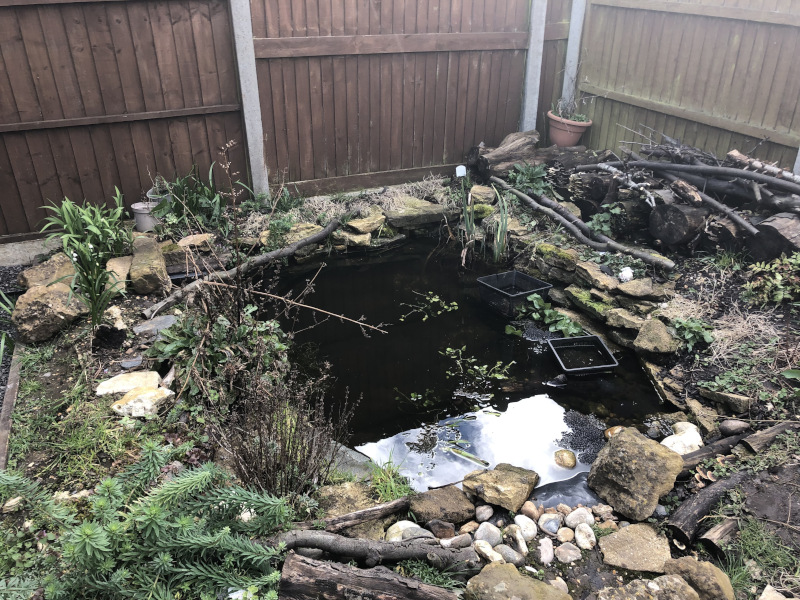
The next factor is how pretty you want to make it? If it is going to be a feature in your garden, as well as a kindness to nature then the prettier it is the better. Also if it looks nice then maybe just maybe, the next owner of the property will not fill in the pond. Of course “not being filled in” is important, as filling it in, is a small scale environmental disaster. Prettiness requires some extra work compared to just sinking a hole in the ground with water in it. However, making it pretty is the more fun part of the task - see edging section for details on this.
Choosing the Liner
A pond liner is the barrier that keeps your pond water tight. There are multiple options to lining a pond. Liners fall in to two general categories, rigid liners and flexible liners. Rigid liners are made from materials such as clay, concrete, pre-formed hard plastic and fibre glass. With the exception of pre-formed plastic liners, rigid liners are generally more effort to work with and more expensive than the flexible type. As mentioned pre-formed plastic liners are the exception as installing is simply a case of digging a hole the size and shape of the liner and placing it in the hole.
Flexible liners are made of water proof materials such as PVC or butayl rubber. These are very easy to install compared to fibre glass or concrete as the are easily moulded to the shape of the hole you have dug. The trade off is they are more easily punctured by stones, tree roots, pets and birds with hefty beaks such as herons. This vulnerability to puncture can be offset by using an underlay (and ideally an overlay).
An underlay is a protective layer that sits between the ground and the pond layer. The choice for underlay is wide, examples include building sand, purpose made underlay fabric, loft insulation or carpet and rugs. You can use a combination of one or many of these lining materials in one pond. For example, if you don’t have a large enough length of carpet you can supplement it with sand.
Choosing a spot
Selecting where to site your pond is something you want to get right first time, as moving a pond is a significant hassle. Somewhere reasonably level, a few metres distance from your house and away from any trees.
I have suggested to site the pond a few metres away from your house. This isn’t essential but it is something I prefer to do, as having a body of water too close to my house doesn’t seem sensible. Away from trees, is again not essential, however trees can cause the following issues: excess leaf matter, roots damage and can block sunlight. Leaf matter will rot away in your pond and will need to be cleared on occasion, which is a chore. Roots puncturing the liner is of course serious as it will likely cause the pond to leak. Sunlight is important as it helps creatures that populate the pond to thrive, daphnia and tadpoles being two such examples.